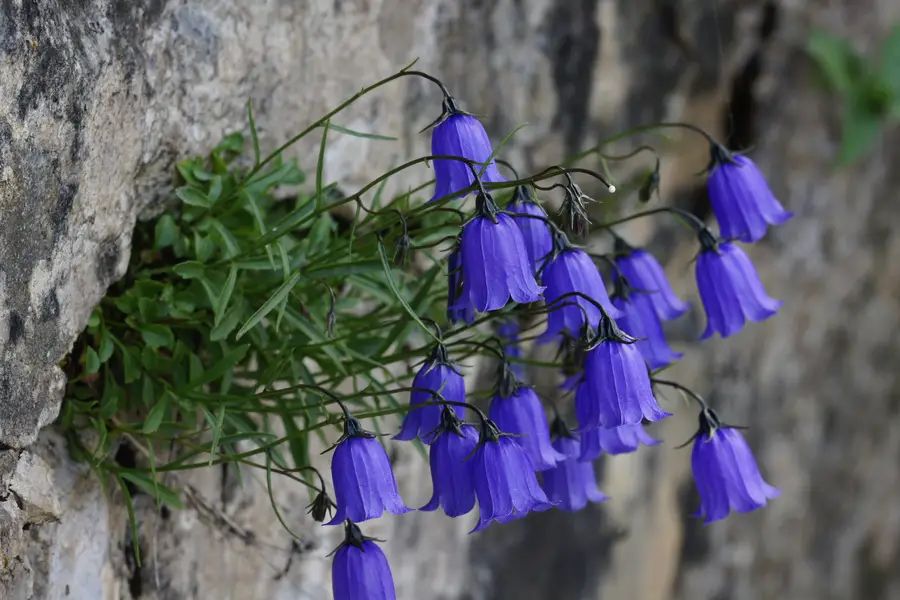
Bellflowers, scientifically known as Campanula, are a beautiful addition to any garden. Known for their bell-shaped flowers and diverse variety, these charming plants can brighten up your outdoor space with minimal effort. Whether you’re a beginner gardener or a seasoned pro, growing bellflowers is a rewarding experience. In this comprehensive guide, we’ll cover everything you need to know about growing and caring for bellflowers, from planting and propagating to dealing with pests and encouraging blooms.
Table of Information
| Common Name | Bellflowers |
| Botanical Name | Campanula |
| Family | Campanulaceae |
| Plant Type | Perennial, biennial, or annual |
| Mature Size | 6 inches to 3 feet tall, depending on variety |
| Sun Exposure | Full sun to partial shade |
| Soil Type | Well-draining, fertile soil |
| Soil pH | Neutral to slightly acidic (6.0 to 7.5) |
| Hardiness Zones | 3 to 9 |
| Native Area | Europe, Asia, and North America |
| Toxicity | Non-toxic to humans; mildly toxic to pets |
Bellflowers Care
Bellflowers are relatively easy to grow and care for, which makes them a popular choice for gardeners. They thrive in a variety of conditions but prefer cool climates and well-draining soil. Below are the key factors to keep in mind when growing bellflowers:
1. Light Requirements
Bellflowers grow best in full sun to partial shade. If you live in a region with intense summer heat, providing afternoon shade will help prevent the plant from wilting or burning. For the best flowering, aim for at least 4-6 hours of sunlight per day.
2. Soil Conditions
These plants prefer fertile, well-draining soil. Amend your garden soil with compost or organic matter to improve drainage and boost nutrients. A neutral to slightly acidic pH (6.0 to 7.5) works best for bellflowers.
3. Watering
Bellflowers need consistent moisture, especially during the growing season. Water the plants regularly, but avoid overwatering, as soggy soil can lead to root rot. A general rule is to water when the top inch of soil feels dry to the touch.
4. Temperature and Humidity
Bellflowers thrive in cool climates. They can tolerate some heat but may struggle in prolonged high temperatures. While they don’t require high humidity, consistent moisture in the soil is crucial for their growth.
5. Fertilizing
To encourage healthy growth and blooms, fertilize bellflowers in the spring with a balanced, slow-release fertilizer. Avoid over-fertilizing, as too much nitrogen can result in lush foliage at the expense of flowers.
6. Mulching
Applying a layer of organic mulch around the base of your bellflowers helps retain soil moisture, regulate temperature, and prevent weeds. Use mulch like straw, bark, or compost.
Types of Bellflowers
There are over 300 species of Campanula, ranging from low-growing ground covers to tall, upright perennials. Below are some of the most popular types of bellflowers:
1. Carpathian Bellflower (Campanula carpatica)
- Carpathian Bellflowers are low-growing plants that reach about 6-12 inches tall. They produce dainty, cup-shaped flowers in shades of blue, white, and purple.
- These are perfect for rock gardens, borders, or container planting.
2. Clustered Bellflower (Campanula glomerata)
- This variety features dense clusters of deep purple, star-shaped flowers on tall stems. They can grow up to 3 feet in height.
- Ideal for adding height to perennial borders or cottage gardens.
3. Canterbury Bells (Campanula medium)
- A biennial variety, Canterbury Bells are known for their large, bell-shaped flowers that come in white, pink, and lavender hues.
- These are often grown as cut flowers due to their long-lasting blooms.
4. Peach-Leaved Bellflower (Campanula persicifolia)
- This tall, upright perennial produces elegant, bell-shaped flowers on slender stems. It can grow up to 3 feet tall.
- It’s well-suited for wildflower gardens and mixed borders.
5. Trailing Bellflower (Campanula poscharskyana)
- A low-growing, trailing species, Trailing Bellflower works well as ground cover, in hanging baskets, or cascading over walls.
- The star-shaped flowers are usually light purple or blue.
6. Milky Bellflower (Campanula lactiflora)
- Known for its soft, milky-white to pale lavender blooms, this variety can reach up to 4 feet tall.
- It thrives in both sun and partial shade.
Pruning
Pruning bellflowers is essential to encourage new growth, improve the plant’s appearance, and extend the blooming season. Here’s how you can effectively prune bellflowers:
- Deadheading: Regularly remove spent flowers (deadheading) during the blooming season. This prevents the plant from diverting energy into seed production and encourages continuous flowering.
- Trimming Leggy Growth: If the plant becomes overgrown or leggy, trim back the stems to promote bushier, healthier growth.
- Cutting Back in Fall: In late fall, cut back the foliage to about 2-3 inches above the ground. This helps the plant prepare for dormancy during winter.
Propagating
You can propagate bellflowers using division, stem cuttings, or seeds. Here’s a detailed look at each method:
1. Division
- When to Divide: Divide bellflowers in early spring or fall when the plant is not actively blooming.
- How to Divide:
- Carefully dig up the plant and separate the root clumps.
- Ensure each section has healthy roots and shoots.
- Replant the divisions in prepared soil and water thoroughly.
2. Stem Cuttings
- Take softwood cuttings in spring or early summer.
- Remove the lower leaves and plant the cutting in a moist, well-draining medium.
- Keep the cuttings in a humid environment until they develop roots.
3. Seeds
- Bellflowers readily grow from seeds. Collect seeds from mature flowers or purchase them from a nursery.
- Sow the seeds directly in the garden or indoors (more on this in the next section).

How to Grow Bellflowers From Seed
Growing bellflowers from seed is an economical and rewarding way to add these beautiful plants to your garden. Here’s a step-by-step guide:
1. When to Plant
- Start seeds indoors 6-8 weeks before the last frost date in spring, or sow them directly in the garden after the frost has passed.
2. Preparing the Soil
- Use a well-draining, lightweight potting mix for indoor planting. If sowing outdoors, prepare the soil by loosening it and adding compost.
3. Sowing Seeds
- Sprinkle the seeds on the soil surface and lightly press them in. Bellflower seeds require light to germinate, so do not cover them with soil.
- Keep the soil consistently moist but not waterlogged.
4. Germination
- Seeds usually germinate within 14-21 days. Place the seed tray in a bright, warm location with temperatures around 65-70°F (18-21°C).
5. Transplanting
- Once the seedlings develop 2-3 sets of true leaves, transplant them into larger pots or directly into the garden.
- Space the plants 12-18 inches apart to allow good airflow and room for growth.
Potting and Repotting
Bellflowers grow well in containers, making them perfect for patios, balconies, and small spaces.
Potting
- Choose a pot with good drainage holes.
- Use a well-draining potting mix enriched with compost.
- Plant the bellflower and water thoroughly.
Repotting
- Bellflowers benefit from repotting every 2-3 years to refresh the soil and give the roots more space.
- Repot in early spring before the plant starts active growth.
- Gently remove the plant, prune the roots if needed, and place it in a larger pot with fresh soil.
Overwintering
Bellflowers are hardy plants, but preparing them for winter ensures they return healthy and vibrant in the next growing season. Here are some steps to overwinter bellflowers effectively:
- Cutting Back: Once the first frost hits, cut back the foliage to about 2–3 inches above the ground. This helps the plant conserve energy during dormancy.
- Mulching: Apply a thick layer of organic mulch, such as straw or wood chips, around the base of the plant. This provides insulation for the roots and protects them from freezing temperatures.
- Container Plants: For bellflowers grown in containers, move them to a sheltered location like a garage or unheated greenhouse to prevent frost damage. Water sparingly during winter.
- Protecting Delicate Varieties: If you’re growing more delicate species like Campanula medium, consider covering them with frost blankets for added protection.
Common Pests and Plant Diseases
While bellflowers are generally low-maintenance, they can sometimes fall prey to pests and diseases. Here’s what to watch for:
1. Common Pests
- Aphids: Small, sap-sucking insects that cause distorted leaves and sticky residue. Control aphids with insecticidal soap or a strong water spray.
- Slugs and Snails: These pests can chew large holes in leaves and flowers. Use organic slug pellets, diatomaceous earth, or traps to keep them at bay.
- Spider Mites: Tiny mites that cause stippled leaves and webbing. Rinse plants with water and use neem oil to deter infestations.
2. Common Diseases
- Powdery Mildew: A fungal disease that appears as white powder on leaves. Ensure good airflow around the plants and avoid overhead watering.
- Root Rot: Overwatering or poor drainage can cause the roots to rot. To prevent this, ensure the soil is well-draining and let it dry slightly between waterings.
- Rust: Orange or brown spots on leaves indicate rust fungus. Remove infected leaves and apply fungicide if needed.
How to Get Bellflowers to Bloom
If your bellflowers are not blooming, there are a few factors to check and address:
- Sunlight: Bellflowers need at least 4–6 hours of direct sunlight. Ensure they are planted in a location with adequate light.
- Soil Quality: Poor or nutrient-deficient soil can limit blooming. Add compost or balanced fertilizer to boost nutrients.
- Overcrowding: If the plants are too crowded, they may struggle to bloom. Divide the plants every few years to improve airflow and growth.
- Deadheading: Regularly deadhead spent flowers to encourage new blooms.
- Pruning: Cutting back leggy growth can redirect energy into flower production.
Common Problems with Bellflowers
Despite being easy to grow, bellflowers can face some common issues. Here’s how to troubleshoot them:
- Yellowing Leaves: This is often a sign of overwatering, poor drainage, or nutrient deficiency. Allow the soil to dry slightly and fertilize if needed.
- Wilting: Wilting can occur in high heat or due to underwatering. Water deeply and provide afternoon shade during intense heat.
- Sparse Blooms: Lack of sunlight, poor soil quality, or overcrowding can cause fewer flowers. Address these factors to promote blooming.
- Leggy Growth: Bellflowers may become leggy if they are not pruned or receive insufficient light. Trim back stems to encourage bushier growth.
FAQ
Q: Are bellflowers easy to grow?
A: Yes, bellflowers are easy to grow and require minimal maintenance, making them ideal for both beginner and experienced gardeners.
Q: Can bellflowers grow in shade?
A: Bellflowers can tolerate partial shade but bloom best when they receive 4–6 hours of sunlight daily.
Q: How often should I water bellflowers?
A: Water bellflowers regularly, keeping the soil evenly moist but not soggy. Allow the top inch of soil to dry between waterings.
Q: Are bellflowers deer-resistant?
A: While no plant is completely deer-proof, bellflowers are considered deer-resistant and are usually avoided by these animals.
Q: Can I grow bellflowers in pots?
A: Yes, bellflowers thrive in containers as long as the pots have good drainage and the soil remains moist but not waterlogged.
Read also: How to Grow and care of Amaryllis Plant: A Complete Guide for Stunning Blooms